Carl's platform Reloaded

Here you can show and share your design ideas and ask questions about them

Re: Carl's 2DOF Wiper motor 12v12 platform

Postby crs2012 » Thu 25. Jul 2013, 05:35

Did you fit any caps or diodes into your card dc supply wiring circuit to manage back emf or is it nothing to be worried about?


I guess it depends who you ask on this one, the answer will always be different. I guess it depends on how careful someone
wants to be. Some believe using every precaution necessary is the way to go. Others may opt for whatever works.

I'm somewhere in the middle. As long as enough measures are already in place 'somewhere' in the system, then it should
be ok. In my particular situation, since you asked what I did with my setup, I did not require any extra caps or diodes. The
PSU and boards I used were perfectly capable of handling everything. So adding anything else was just overkill for my setup.

I'll add some pictures of my control box to my project page in the next few days. It's actually a very simple wiring setup.

the Mrs would kill me if I attempted to bring a car battery into the living room


HAHA, well at least she's cool with the simulator being there!

How much did them scn5's cost...


I think each actuator was $575'ish at the time + tax + shipping. I think the prices came down a little bit on those actuators
since the time I bought them.
User avatar
crs2012
 
Posts: 46
Images: 61
Joined: Thu 16. Aug 2012, 05:35
Location: Texas
Has thanked: 0 time
Been thanked: 3 times

Re: Carl's 2DOF Wiper motor 12v12 platform

Postby Carl » Sun 25. Aug 2013, 13:01

Well things have moved on quite a bit since my last post. I bought 3 cheap 12vdc 30a psu's of ebay for £25 each. Power wise I think they are great but I must say 1 of the 3 I bought died within 20 minutes of powering up. Glad I bought a spare. The other 2 have been running fine now for over a week without issue.

I could not help myself being so close to motion and cut a few corners just to get it rocking. I have to tidy up the electrics this week, put some fuses in to protect the jrk's 'n motors + I need to wire in a kill switch and do some supplementary bonding but thats for later. I AM ROCKING! :mrgreen:

What a BLAST!!! The platform was a bit jumpy at first so I did a lot of playing with the motor and PID settings. I found that although my motors were pretty closely matched the setting I have found that work best are miles away from what I have read as good starting points for wiper motors. I am currently running 4:2, 0:3, 20:7 and 4:2, 0:3, 15:2 on my wiper motors. Motor settings wise I have duty cycle and max.acceleration max'd out and brake duration down to 5ms. Heres where things get confusing, I have my Max. current set at 0.255 and my current calibration set to 1. This does not make much sense to me but it works. Maybe one of you guys could shed some light on this setting in the jrk config utility and what the current calibration number has to do with the price of fish. It works well as it stands but I would like to know why. :?:

I am still learning and getting to know how to work with the x-sim software (need to read some more about math plugin setup) but were operational so no panic. Can somebody point me in the direction of a good tutorial on math setup please. I need to understand the range parameter... min and max values? splitting neg and pos and why? Auto adjustment? Thanks for your help in advance peeeps. Also the third step is all a bit confusing for me... add, multiply or overwrite result? I currently have longitudinal and lateral force set up with "add result value"... again this works but it would be nice to kn0w why. I played about with the smoothness setting and can see what that does and same with intensity. Also when would you use the log, mean, smoothness and spike filters? When would you use a scaler? HMMMM.... so many questions. Im goona try and upload some videos now... my boy loves it... so do I.
Carl
X-Sim Supporter
 
Posts: 59
Images: 115
Joined: Sun 29. Jul 2012, 19:13
Location: North Hampshire UK
Has thanked: 6 times
Been thanked: 1 time

Re: Carl's 2DOF Wiper motor 12v12 platform

Postby Carl » Sun 25. Aug 2013, 13:04

Almost forgot to mention, mechanically I had to fit two trampoline springs on line with the pivot point to assist the motors in righting the platform and counteract the gas struts. An unfortunate necessity but needed given the entire platform is made from aluminium and rather heavy.
Carl
X-Sim Supporter
 
Posts: 59
Images: 115
Joined: Sun 29. Jul 2012, 19:13
Location: North Hampshire UK
Has thanked: 6 times
Been thanked: 1 time

Re: Carl's 2DOF Wiper motor 12v12 platform

Postby Carl » Sun 25. Aug 2013, 14:49

first attempt at uploading a vid... epic fail!
Last edited by Carl on Tue 27. Aug 2013, 21:13, edited 2 times in total.
Carl
X-Sim Supporter
 
Posts: 59
Images: 115
Joined: Sun 29. Jul 2012, 19:13
Location: North Hampshire UK
Has thanked: 6 times
Been thanked: 1 time

Re: Carl's 2DOF Wiper motor 12v12 platform

Postby Carl » Sun 25. Aug 2013, 15:14

Last edited by Carl on Tue 8. Apr 2014, 21:08, edited 1 time in total.
Carl
X-Sim Supporter
 
Posts: 59
Images: 115
Joined: Sun 29. Jul 2012, 19:13
Location: North Hampshire UK
Has thanked: 6 times
Been thanked: 1 time

Re: Carl's 2DOF Wiper motor 12v12 platform

Postby Carl » Sun 25. Aug 2013, 15:33

I now have a longitudinal, Lateral and z axis force inputs outputting to my 2 motors via the jrk's and it is working sweet. You will notice from my next video that the movements are quite smooth. I have it set up this way intentionally. I prefer it less bumpy. I will try and get a video up later.

BIG BIG THANKS TO THE DEVELOPERS of this software and all the people on this forum who inspire people like me to have a go at building what all of us would have dreamed impossible as a kid.
Carl
X-Sim Supporter
 
Posts: 59
Images: 115
Joined: Sun 29. Jul 2012, 19:13
Location: North Hampshire UK
Has thanked: 6 times
Been thanked: 1 time

Carl's upgraded SCN6 2dof motion sim

Postby Carl » Mon 7. Apr 2014, 19:27

Well after a lot of soul searching and several months trying to squeeze more than was available from 2x pololu 12v12s and wiper motors I decided the time was right to upgrade my pololu 12v12 wiper motors with SCN6's. As everybody knows these are very pricey indeed so I had to sell off some kit to buy some new kit. The 30 watt co2 laser cutter went on ebay and the SCN6's came via Canada from Japan. A very good trade. Living the dream!!!Although my first incarnation was great fun for my 8 yo boy it definitely lacked the grunt and range to keep me happy.

I have built my platform to date mainly from bits of scrap salvaged from work

The parts I have been forced to purchase so far are as follows:

Fanatec GT3 wheel - £70 off ebay
Fanatec Clubsport pedals - £150 off ebay
Racing seat with rails (fully adjustable) - £50 off ebay
MGB Drive shaft / universal joint - £20 off ebay
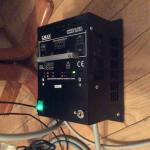
7.5a 24v PSU - £17 off ebay
2x SCN6 40 150's - $1,841.72 USD(£1,108.64) (+£150 import duty) from Mirai
2x 14x1.5 teflon lined rod ends - £20 from Mcgill motorsports
4x 14mm/12mm reducing misalignment bushes - £10 from Mcgill motorsports
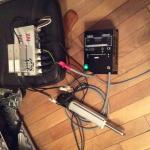
2x USB-RS485 converters - £30 off ebay
2x USB 3m extension leads - £10 off ebay
2x 2.2k resistors and 2x 27v zener diodes - £1 Maplins

Total parts spend £1,636

Parts and materials I have rescued and re-cycled from the skip at work
An awful lot of 6mm thick alloy chequer plate (3x 1.6mx1.0m sheets)
2x part used articulated pneumatic cylinder mounts

The tools I have to hand and used to get me this far were as follows:

Pedestal drill
Jig saw x2 (burned my first one out cutting all the alloy chequer plate up)
Mains drill
Battery drill
Dremel
Chop saw
Table saw
30w co2 laser cutter (now gone)

Time to build
Although I have spread the build almost over a year I estimate the actual hours spent working on this to be in the region of 80-100 hours.

As my platform is mainly aluminium, metal and stainless steel I also ended up buying an awful lot of nuts, bolts and drill bits during the build and I am now on first name terms with my local hardware store owner... in fact over the last 2 months I am probably his best customer.

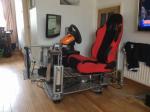
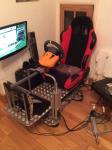
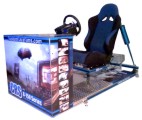
My design has evolved as it came together but the basic premise was to try and build a platform somewhat similar to Floriske's playseat. To that end game I don't think mine is too far away + I love it.

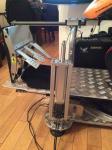
I could have tried to make it straight off the bat from CAD designs (I have a lot of experience working with AUTOCAD, Mechanical Desktop and Autodesk Inventor) but to be honest I think the trial and error route is a much more enjoyable experience. I had several difficulties to overcome during the build with weight being the primary obstacle. To get around this I used a couple of gas struts underneath to balance off the weight of the front end of the upper platform. It is very well balanced at the moment with no load experienced at the motors when I am sat in the seat. I got quite nervous about the pivot point from my original design and shifted it back 150mm to directly under the seat when fitting the SCN6's. I have posted a cad drawing to show the geometry and dimensions of my design.

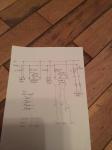
I tried to follow the instructions on wiring the SCN6's to the letter but also added some little touches of my own. I used some spare xlr chassis sockets and plugs to create an interrupt / isolation point between PSU and drives for when not in use which I had left over from a previous project. I mounted these onto an old psu case and also hid the usb rs485 converters. I also added an e-stop relay instead of wiring direct to the ilk pin. I have posted a full wiring diagram and show the basics in my scribbled schematic drawing. CAD files and high res photos of anything pertaining to my platform can be supplied if you PM me.

Here are some pics and vids of the build as it came together and also of course as it is now.
2731
27242723272227212725
Last edited by Carl on Wed 16. Apr 2014, 22:20, edited 13 times in total.
Carl
X-Sim Supporter
 
Posts: 59
Images: 115
Joined: Sun 29. Jul 2012, 19:13
Location: North Hampshire UK
Has thanked: 6 times
Been thanked: 1 time

Re: Carl's upgraded SCN6 2dof motion sim

Postby Carl » Mon 7. Apr 2014, 19:44

Here are the latest pics taken... I'm now setting up the drives on converter so may be needing some advice soon.
2731
This is my simulator in all its glory.
2732
One of the mounts I made for the motors using some extruded channel (22mm) and some 10mm alloy plate
2733
I ripped apart an old linear psu and stuffed the fuses and new switch mode psu inside. I also used it as a jb to connect up my safety circuit and relay plus some thermal trips. The green illuminated switch turns on mains and the flip switch turns on the 24v.
2734
Here is the other end with the drives, xlr plugs, and rs485 converters
2735
as you can see from this pic the misalignment spacers are fitted on the rod ends. probably not needed but thought they would be a good idea
Last edited by Carl on Sat 12. Apr 2014, 19:44, edited 4 times in total.
Carl
X-Sim Supporter
 
Posts: 59
Images: 115
Joined: Sun 29. Jul 2012, 19:13
Location: North Hampshire UK
Has thanked: 6 times
Been thanked: 1 time

Re: Carl's upgraded SCN6 2dof motion sim

Postby Carl » Tue 8. Apr 2014, 01:36

Had my first full race tonight with 80% longitudinal, 60% lateral and 75% z axis forces... very cool indeed. Im very happy with the speed, feel and amount of motion. I will record a vid tomorrow to show it in action. Now I Just need to be creative and design some guards for the scn6's and finish off the safety stuff. I need to fit an e-stop near the wheel within reach and guard around the scn6 to protect against against the pinch point.
Carl
X-Sim Supporter
 
Posts: 59
Images: 115
Joined: Sun 29. Jul 2012, 19:13
Location: North Hampshire UK
Has thanked: 6 times
Been thanked: 1 time

Re: Carl's upgraded SCN6 2dof motion sim

Postby nclabs » Tue 8. Apr 2014, 20:51

As you can see, the forum it's really quite. Nevermind. Congratulations for your sim, I did myself one with your very same actuators, boy, they are awesome, but quite expensive. If you want we can exchange some infos!
nclabs
X-Sim Supporter
 
Posts: 33
Joined: Wed 30. May 2012, 22:14
Has thanked: 0 time
Been thanked: 1 time

PreviousNext

Return to Motion simulator designs

Who is online

Users browsing this forum: No registered users and 2 guests