This is an updated resume of what I have achieved so far.
Some of the relevent information has been reposted from the old Xsim2 site.
I started out designing a steel frame "joy rider". This design has now been morphed into a hybrid system that draws ideas from a number of configurations found on these forums and elsewhere on the internet.
Thanks to those who share their ideas and enrich everyones knowledge.


Raceflight V2
35 posts
• Page 1 of 4 • 1, 2, 3, 4
Raceflight V2
![]() by Bruceaust » Mon 16. Jul 2012, 11:30
by Bruceaust » Mon 16. Jul 2012, 11:30
-
Bruceaust - X-Sim Supporter
- Posts: 72
- Joined: Thu 10. May 2012, 10:52
- Location: Launceston, Tasmania, Australia
- Has thanked: 0 time
- Been thanked: 0 time
Re: Raceflight V2
![]() by Bruceaust » Mon 16. Jul 2012, 11:50
by Bruceaust » Mon 16. Jul 2012, 11:50
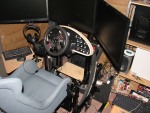
- Construction finished, just need to get the motion going.

(Thanks Deriy for the seat design)
-
Bruceaust - X-Sim Supporter
- Posts: 72
- Joined: Thu 10. May 2012, 10:52
- Location: Launceston, Tasmania, Australia
- Has thanked: 0 time
- Been thanked: 0 time
 Viewed 37907 times")
 Viewed 37907 times")
-
Bruceaust - X-Sim Supporter
- Posts: 72
- Joined: Thu 10. May 2012, 10:52
- Location: Launceston, Tasmania, Australia
- Has thanked: 0 time
- Been thanked: 0 time
Re: Raceflight V2
![]() by Bruceaust » Mon 16. Jul 2012, 13:02
by Bruceaust » Mon 16. Jul 2012, 13:02
 Viewed 37907 times")
Pitch and Roll frame with revised wiper actuator system
 Viewed 37907 times")
(descarded motion actuator - did not use this system in the final version)
 Viewed 37907 times")
The latest version of the motion actuator system
 Viewed 37907 times")
Pitch frame motion . Cable tension adjustment on ends
 Viewed 37907 times")
Roll frame bearing detail.
-
Bruceaust - X-Sim Supporter
- Posts: 72
- Joined: Thu 10. May 2012, 10:52
- Location: Launceston, Tasmania, Australia
- Has thanked: 0 time
- Been thanked: 0 time
Re: Raceflight V2
![]() by Bruceaust » Mon 16. Jul 2012, 13:26
by Bruceaust » Mon 16. Jul 2012, 13:26
Wiper Motor Modification for fitting the feedback pots directly to the motor output shaft.
Output gear removed fro motor and held in lathe
Turn down the thickness of the bolt head so that it can be "melted' into the plastic gear.( heat bolt head with a small butane torch)
Hold the bolt in the the lathe tailstock chuck to produce a perfect alignment to the gear shaft.
push the hot bolt head into the gear with the tailstock chuck
Turn the face flush under the bolt head to restore the "bearing" face
Drill a hole in the motor cover plate using the lathe.
The reassemble the motor so that the bolt protrudes through the motor cover plate.
Make a mounting bracket to hold the feedback pot in allignment with the motor shaft
 Viewed 37905 times")
Output gear removed fro motor and held in lathe
 Viewed 37905 times")
Turn down the thickness of the bolt head so that it can be "melted' into the plastic gear.( heat bolt head with a small butane torch)
Hold the bolt in the the lathe tailstock chuck to produce a perfect alignment to the gear shaft.
 Viewed 37905 times")
push the hot bolt head into the gear with the tailstock chuck
 Viewed 37905 times")
Turn the face flush under the bolt head to restore the "bearing" face
 Viewed 37905 times")
Drill a hole in the motor cover plate using the lathe.
The reassemble the motor so that the bolt protrudes through the motor cover plate.
 Viewed 37905 times")
Make a mounting bracket to hold the feedback pot in allignment with the motor shaft
-
Bruceaust - X-Sim Supporter
- Posts: 72
- Joined: Thu 10. May 2012, 10:52
- Location: Launceston, Tasmania, Australia
- Has thanked: 0 time
- Been thanked: 0 time

Re: Raceflight V2
![]() by Bruceaust » Tue 24. Jul 2012, 02:18
by Bruceaust » Tue 24. Jul 2012, 02:18
- 10K 5 turn Feedback Potentiometers fitted to Wiper Motors

-
Bruceaust - X-Sim Supporter
- Posts: 72
- Joined: Thu 10. May 2012, 10:52
- Location: Launceston, Tasmania, Australia
- Has thanked: 0 time
- Been thanked: 0 time
Re: Raceflight V2
![]() by Bruceaust » Tue 24. Jul 2012, 23:52
by Bruceaust » Tue 24. Jul 2012, 23:52
In the process of fitting Limit switches to both X and Y Axis. I am wiring the switches to control a contactor. The limit switches are wired in series with a toggle switch that controls the contactor, so that the 12v supplies to the input of the H bridge can be isolated manually as well as by the limit switches.
 Viewed 37851 times")
 Viewed 37851 times")
-
Bruceaust - X-Sim Supporter
- Posts: 72
- Joined: Thu 10. May 2012, 10:52
- Location: Launceston, Tasmania, Australia
- Has thanked: 0 time
- Been thanked: 0 time
Re: Raceflight V2
![]() by Bruceaust » Thu 26. Jul 2012, 14:02
by Bruceaust » Thu 26. Jul 2012, 14:02
Oh well 
Had limited success testing the motion.
The AVR/Hbridge worked ok, except I overheated and blew a couple of Fets in the Hbridge.
I think I am trying to move to much mass to quickly, or the Hbridge is not able to supply enough current when
the wiper is struggling to move.
I will need to re-think my motor/motor driver options.
Nice to get it moving though!
-
Bruceaust - X-Sim Supporter
- Posts: 72
- Joined: Thu 10. May 2012, 10:52
- Location: Launceston, Tasmania, Australia
- Has thanked: 0 time
- Been thanked: 0 time
Re: Raceflight V2
![]() by floriske » Thu 26. Jul 2012, 14:24
by floriske » Thu 26. Jul 2012, 14:24
Ouch! Always a pain if something breaks 
But like you said, I think you are indeed expecting a bit too much from your motors.
Nevertheless congrats on getting it moving!
But like you said, I think you are indeed expecting a bit too much from your motors.
Nevertheless congrats on getting it moving!
I am no longer an admin/active moderator at http://www.x-sim.de. Please contact one of the other admins or moderators if you have any questions. Thank you!
My sim-project: Floriske.nl's 2DOF Playseat GT Wiper motor Project (sold)
My sim-project: Floriske.nl's 2DOF Playseat GT Wiper motor Project (sold)
-

floriske - Posts: 238
- Images: 96
- Joined: Mon 2. Jul 2012, 10:23
- Location: The Netherlands
- Has thanked: 8 times
- Been thanked: 8 times
35 posts
• Page 1 of 4 • 1, 2, 3, 4
Return to Motion simulator Projects in progress
Who is online
Users browsing this forum: No registered users and 11 guests
